“National park heaven! Plan out your trip wisely and efficiently!”
Day 1: Land in Vegas, Valley of Fire, (spend the night in Kanab, Utah- town that’s halfway between Utah parks and Arizona)
Day 2: Page, AZ (spent the night Kanab, Utah)
Day 3: Bryce Canyon (stayed the night in Springdale, Utah, to get up earlier for Zion)
Day 4: Zion AM, Vegas PM, (stayed the night at MGM Vegas)
Day 5: AM fly back
Day 1: Valley of Fire
2:30pm – landed and grab bags, pick up rental car (through Turo)
3:30pm – lunch at Pokeman (15 min drive)-originally planned to have lunch somewhere nice on the strip but due to flight delay, decided on something quick
4:30pm– Grabbed 85 degrees or bubble tea from ShareTea next door for the drive
4:45pm – drive to Valley of Fire State park (1 hr 10 min drive)
6pm – Reach Valley of Fire Entrance center – $10 per vehicle (make sure you have exact cash cause it’s often self-pay)
-drive through the park (can take anywhere from 1-2 hours depending on what you wanna cover and hiking trails you wanna do)
- Best time to visit is golden hour, the colors of the rocks are their sharpest
- Perfect spot for photo shoots since it’s so driveable and easy to find secluded areas, we passed by many photographers doing the same
- there’s occasional patrol cars but after telling us to be careful once, they didn’t really bother much
7:30pm – leave Valley of Fire and head to dinner in St George (The closest city halfway to Kanab with multiple dinner options)
- Our GPS originally said it was 1.5 hours to St George, but beware, your location in the park may vary the deeper you go in, which could increase your driving time by even an hour.
10:30pm – after dinner, drive from St George to Kanab, Utah (1 hr 20 min)
Day 2: Page, AZ
8:30am – wake up, grab breakfast, leave for Page AZ (to get there at 9:15am) *time change*
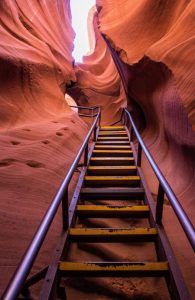
10am-12pm – Upper Antelope Canyon tour with Chief Tsosie (booked in advance, summer tour dates get booked quickly so plan ahead),
- you can’t enter the Antelope canyons without booking a tour since its on Native land (unless you’re kayaking the river and looking at it from the other side, but you still can’t enter the main canyon ), you won’t get the same up close views and experience that you will by doing it with the tour guide, the views are absolutely worth your money
- Upper Canyons were the most popular “insta worthy” views so we opted for that, but you can also do lower.
- They bus you in and out of the canyon, walk you through, whole experience is just shy of 2 hours, and only 2-3 tour guide agencies can perform tours there so you have to book through one of them
- They do have very strict COVID restrictions and require a mask the entire time for the tour. Our tour guide was a little lenient and allowed us to remove masks briefly for pictures, but others were not so much.
- Reserve a time slot closer to noon if you want photos of sunlight peering into the canyons.
- The guides give you lots of background, many photo ops, the perfect angles, and even adjust the settings on your camera to help you capture the canyons in the best lighting possible.
- our highlight was when our tour guide played a native tune with his flute while we were within the canyon (be sure to tip your guides)
12:30pm – pick up lunch from nearby
1pm – drive to Antelope Point Marina at Lake Powell, (13 min drive from Antelope Canyon tour office) https://antelopepointlakepowell.com/boat-rentals-tours/small-boat-rentals/
- Rent a boat (min of 2 hours-plenty of time to enjoy the amazing views), we called an hour before and they still had some available. Not all boats can be reserved, some of them are walk-in only.
- We opted for an 8 seater deck boat. Ours even had a speaker connected to our phone which was super cool to sail around and listen to music.
- you have to sign a waiver, a security deposit, and they give very brief instructions on how to use the boat, but it wasn’t that hard to use
- swimming isn’t allowed in the lake outside of the shallow ends where the boats dock, don’t underestimate how deep it is, swim at your own risk.
- try not to steer too far away from the map so you can get the boat back in time for the rental, keep in mind the time change from UT to AZ borders
- you have to park and fill up your boats gas upon return, but there’s people to help you do that
- Bring enough cold water to keep you cool in the heat of the sun
4pm – Drive to horseshoe bend (15 min drive from Antelope Marina)
- $10 entrance fee at the parking lot
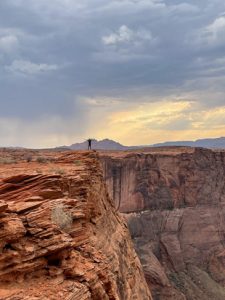
- No guide rail, be careful of steep dropoff. Always crowded
- Easy walk from parking lot to the view
6pm – head over to UTV sunset tour (6:30-8:00pm but get there 30 mins early for set up) sunset around horseshoe bend from (5 min drive from horseshoe)
- Booked through Epic Adventure Rides- www.epicadventurerides.com
- They let you drive your own UTV, and guide you along the tracks (sometimes showing you fun tricks), while giving you plenty of options to switch between drivers and stop for pictures
- Grab dinner locally (not many options especially later at night)
9pm – Drive back to Kanab Utah (keep in mind time change, if you leave AZ at 9 pm, and it’s a 1 hour drive, you’ll reach Kanab at 11pm)
Day 3: Bryce Canyon
10 am – wake up, grab breakfast, head out to bryce canyon
12pm – reach Bryce canyon (1 hr 20 mins drive) $35 per vehicle entrance fee
- Bryce has hiking trails but you can also park and drive up to most of the viewpoints as a shortcut, definitely try doing the major trails to fully get to appreciate the bryce amphitheater and the hoodoos
- Parking wasn’t that hard to find. There were lots of people there but it was less crowded than Zion. We drove to many of the view points in a loop around the park after our first hike. It was easy to get in and out, we left to go have dinner in a town nearby, and came back for sunset and stargazing.
12:30pm-2:30pm: Queens Loop/ Navajo Trail
- Gives you the best views of the park highlights
2:30-5pm : check out different viewpoints. Most of them are short walks from the parking lot.
- Inspiration point
- (our favorite, walk further up to upper inspiration point for the best view of the whole park)
- Cool landmarks to check out:
- Thors hammer, natural bridge, rainbow point
5:30pm – Left Bryce to go get Dinner at a neighboring town,
8pm – went back to Inspiration Point to catch the last bits of sunset
9pm or later – Stargazing at Bryce
- Follow tips: https://www.nps.gov/thingstodo/see-the-night-sky.htm
- Bring blankets to lay on so you can get the full experience
- We stayed close to the parking lot so it wouldn’t be hard to navigate around in the dark
10pm – Drive to Springdale, UT (just outside of Zion) – 1 hr 50 min drive
Day 4: Zion AM/Vegas PM
7 am – wake up, get breakfast, All food places, shuttle stops, rentals, and park entrance were within a short drive from the hotels in Springdale, was really convenient.
8 am – pick up E bikes , we chose https://www.zionadventures.com/zion-canyon-bike-rentals.html. And reserved a few days in advance.
- Ebikes made it SO easy to bike around the Zion hills.
- Since Zion is the most popular park in the summertime, you can’t drive within the park stop to stop like we did for Bryce..They have main parking lots and then shuttles to get you around. The shuttles even stop within Springdale, UT
- We opted for the Ebikes so we wouldn’t have to worry about waiting for the shuttle, being cramped in the shuttle during COVID, and having the flexibility to leave when we want. The shuttles were running frequently but the popular trailheads (Narrows) still had larger crowds later in the day
- Park our car on the street by the bike rental shop
8:15 am – Pick up lunch and enough water for the day (there’s a subway right by the Zion entrance). Bikes had areas for storage.
8:30 am – pick up Narrows gear from https://zionoutfitter.com/ (we reserved ahead of time since the hike is really popular). They have lockers for your belongings. Your bikes have a hiking pole holder and room for storage. You can choose to rent the bikes and gear from one store to save a trip.
- We rented hiking poles, boots, waterproof socks, and a waterproof backpack to keep our phones and lunches safe in case it got wet.
- Definitely would not recommend doing this hike in regular sneakers as you’re walking through mid calf high water in a river for hours, and the rocks can be really slippery. Boots & waterproof socks are a must. The walking stick really helps you know how deep the water is ahead of you. There were a couple sticks at the trailhead.
9:00 am – Park entrance (right next to Zion Outfitters) ($35 per vehicle fee or $20 per person, they still honored the group vehicle rate for us even though we were on bikes)
- Bike the Pa’rus trail (~45 mins one way) and follow signs for Temple of Sinawa (shuttle stop for Narrows trailhead)
- Once you get on the main road, you have to yield to buses, but other than that, the roads are completely car free. Amazing views and experience.
10 am – Park bikes at Temple of Sinawa (Shuttle stop #9)This stop also has a water fill station and restrooms.
- Narrows Bottom Up Trail
- From here on out, the whole hike is very crowded, especially summer crowds
- The Riverside walk that leads you to the Narrows is about 30-40 min one way. Then once you reach the Virgin River, you can choose how deep into the narrows you want to go. It’s a one way hike, you just head back the way you came whenever you’re done. The more scenic areas were about an hour into the river, but the whole hike itself is a unique scenic experience.
- Watch your step for slippery rocks!
3 pm – head back via Pa’rus trail to exit the park
4 pm – return rentals and drive to Las Vegas (2.5 hours)
6:30 pm – Reach Vegas, relax freshen up
8 pm – Dinner on the Vegas strip,
- Chef Gordon Ramsay Burger had great burgers and shakes
9:30 pm – head back to the hotel, next morning fly back home
tips/lessons learned
-
Know the 1 hour time change from Utah to Arizona. Arizona does NOT follow daylight savings
-
Always pack more water and snacks than you think, especially for the warmer days. Invest in a small cooler or lunchbox with frozen ice packs to keep your water and food cold for longer.
-
There’s not many stores or gas stations along the way driving around in Utah, so fill up gas and stock up on food next time you’re in town. Not a trip for foodies either, outside of Vegas, we mostly ate subway or whatever we found
-
Be prepared for lots of long empty drives without cell service. Be safe, and download music for the road beforehand. Your GPS should still run.
-
You don’t really need the whole day for Bryce unless you plan on doing many hikes. We were able to do 1 hike and cover the main viewpoints within half the day. if you want to sleep in and have a late morning- use this day. Especially if you plan on staying late to stargaze
-
When hiking the Narrows, take the flash flood forecast seriously. The weather can change up until the last moment. A lot of the rental stores will post signs to tell you if it seems like a “good, okay, or unsafe” for the hike. Talk to the employees at the store if you want more input, they’ve been doing this longer.
-
In the summer, be prepared for hot temps in the day and cooler temps for Stargazing, narrows, or cooler mornings. A hoodie or light jacket would suffice. Check the weather ahead of time.
-
We were able to cover almost all of Bryce in one day, but Zion is a massive park, we saw just a fraction of it. If you have time, spend more days there.
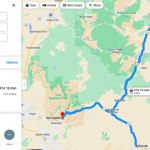
route
- Time of year we travelled: August
- Average Temperature: Ranging from 80 degrees (F) to 90 degrees (F) [pack lots of water!]